Deliver to India
IFor best experience Get the App


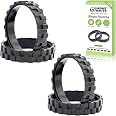
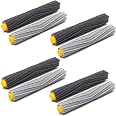
Garbage fighter Tires for IROBOT ROOMBA Wheels Series 500, 600, 700, 800 and 900, e5, e6, i7,Anti-Slip, Great Adhesion and Easy Assembly, Wheel Replacement for All roomba Models (Black 4 Pack)
Details
- Size0.2 x 0.2 x
- MaterialRubber
- BrandGarbage
- Color4wheels
- Thread SizeRM
- Exterior FinishPolished
Description
🛠️ Upgrade your Roomba’s grip game — because smooth cleaning waits for no one!
- VALUE PACKED SET - Includes 4 wheels to fully refresh your Roomba’s mobility
- ENHANCED TRACTION - Anti-skid wheels prevent slips, boosting cleaning efficiency
- PREMIUM DURABILITY - Crafted from high-grade natural rubber to resist wear and tear
- SEAMLESS COMPATIBILITY - Fits all Roomba Series 500-900 & select e and i models effortlessly
- HASSLE FREE INSTALLATION - Quick 4-step assembly to get your Roomba rolling like new
Garbage Fighter replacement tires are precision-engineered rubber wheels compatible with Roomba models 500 through 900, including e5, e6, and i7. Designed for superior anti-slip performance and durability, these easy-to-install tires restore your robot vacuum’s traction and efficiency, ensuring your smart cleaner stays at peak performance.


Specifications
| Size | 0.2 x 0.2 x 2.32 inch |
| Material | Rubber, Silicone |
| Brand | Garbage fighter |
| Color | 4wheels |
| Thread Size | RM |
| Exterior Finish | Polished |
| Item Weight | 13.61 g |
| Number of Pieces | 4 |
| Manufacturer | iTechlife |
| UPC | 717373931144 |
| Part Number | 717373931144 |
| Item Weight | 0.48 ounces |
| Item model number | iRobot Roomba |
| Item Package Quantity | 1 |
| Cutting Diameter | 2.32 Inches |
| Batteries Included? | No |
| Batteries Required? | No |
| Assembled Diameter | 2.32 Inches |
Reviews
J**B
Durable and Effective Replacement Tires for Roomba i6+
The Garbage Fighter Tires for the iRobot Roomba i6+ are a fantastic upgrade! Installation was a breeze, and they provide excellent traction on both carpets and hard floors. My Roomba moves more smoothly, tackles obstacles better, and no longer struggles on rugs like it did with the original wheels. The improved grip has noticeably enhanced its cleaning efficiency, leaving my floors looking spotless.These tires are also impressively durable—I’ve been using them for weeks, and they show no signs of wear. If your Roomba has been slipping or getting stuck, these are the perfect fix. Highly recommend for anyone looking to extend the life and performance of their robot vacuum!
S**N
Simple to install and far cheaper than going through iRobot
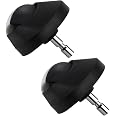
I picked these up for $10 rather than going through iRobot as they make you replace both wheel modules.Installation was simple.1: Unscrew bottom plate by removing 5 screws (See picture)2: Identify the wheel modules, and the two gold screws attaching each.I could see this being a difficult step if you do not have the right equipment, as the phillips heads were small.3: Remove the four gold screws. Modules should lift without resistance.I was able to remove the modules without completely removing the screws that were in the deeper holes.4: Use something (I used needle nose pliers, but I imagine a flathead screwdriver might have been easier) to remove the old tires.I pulled from the lip, and then once I was able to get my pliers underneath the rubber, I slowly worked the tires off. I let my roomba run before I did this job, and because the rubber was still warm, I think it was easier than it would be if they were cold. You will probably end up pulling them off in pieces because the OEM tires are anchored in the plastic wheel. Its ok if bits of rubber get stuck in the insertion points. That will only act as additional friction for the new tires to grip.5: Attach the new tires.This was the easiest and most satisfying part of the job for me. I attached the tires by getting half of the tire on the top, then turning the wheel so the seated portion was on the bottom, then worked the other half on. Make sure the interior rib of the new tire sits properly in the channel of the wheel.6: Reassemble.I used a Phillips #2 for the exterior screws, and a Phillips #1 for the interior screws.This was absolutely worth the money. Gone are the days of my roomba not being able to get on the dock properly, or just turning wheels at a threshold. I gave 5 stars but I would give 10 if Amazon allowed it.
S**E
Just what my i7+ needed!
I've been having issues with my Roomba lately. From not wanting to dock properly, so not charging, to not wanting to empty. I've been cleaning it and replacing the basics to no avail. Then I realized how bad the tires were. I didn't want to waste money and all that unnecessary plastic to buy the entire units so I ordered these to give a go.Removing the old tires was a bit difficult and made me nervous. I did unscrew the main casing and unscrewed the wheel units from the Roomba to make access easier. My old wheels didn't seem to be glued on (if they did, the glue has long worn off) but did have nubs that pushed into holes in the wheel frame. I wedged a screwdriver under a loose part and just pulled and pulled. The nubs broke and stayed in the holes. I then pulled the new treads on. They were a bit tight and I had to slip a small screw driving under it to get it to align to the groove properly, but I only had to do that once and the remaining easily pushed into place. I put it back together and let it go.It is moving much faster and much better now thanks to the traction. It is docking with ease and matching up to the charging sensors and the emptying port. It also seems to be vacuuming much better. It's amazing how just the bad wheel treads have been causing me so many issues.I will update if I have any trouble in the future, but I'm extremely impressed. I can even move my base back onto a carpeted surface now because it was struggling to dock so badly I had to move it to my kitchen.
O**N
Solved months of useless maintenance and research!
I have two Roomba I6+ and the one on my lower level started experiencing docking issues as well as getting stuck in places it historically hadn’t. After doing just about everything I googled to remedy the issue, I ultimately ended up just chasing it around and giving it a nudge to get it up on the dock once went to charge or completed a job. I had given up, but am too cheap to replace a $700+ robot due to a little inconvenience.One day I randomly stumbled across a thread on Reddit that mentioned wheels. I looked at that guy and no surprise, things were balder than me! Months of research, taking that thing apart and cleaning everything..and it was a $4 fix..lol, dumb guys overthinking everything. Once replaced, my robot docks without issue, gonna miss chasing that dude around! I do want to note as several other reviews mentioned, there are no instructions. You will also likely have to cut the old treads off and yank them free of the nubs that hold the originals on. Good news is the remnants of the nubs actually add a little grip to the new tires to the rim, which helps it to remain locked on. Very nice, save yourself the $35 and fix it for $4! Best thing is you get four tires, so if you only have one, you have spares for the next go round!
M**R
Easy to install
They were fairly easy to install on the old wheels. I think they may be slightly thicker than the OEM tires because many times the robot doesn't register on the home base for charging and I have to press down on the robot for it to make contact with the charging contacts.But they seem to have plenty of grip. O)nly time will tell how long they will last.
Common Questions
Trustpilot
2 months ago
1 day ago